How to Apply Brushed Suede Paint
For Professional Results
summary: If you're planning to do a paint project with a metallic paint , this tutorial shows
how to do a brushed metallic copper paint on an imperfect smooth surface.
how to do a brushed metallic copper paint on an imperfect smooth surface.

Brushed Suede Paint. Source: Corbin Henry
The first time I tried to paint with brushed suede, I painted in 3' by 2' sections. This resulted in what I call framing where I could see dark rectangular frames around the areas I painted. This guide will show you how to avoid this mistake, and give you professional results.
Brushed Suede offers the velvety touch of suede, warm earth tones, and rich dimensions of texture to create a subtle feeling of luxury to most any room. There are many paint manufacturers including Valspar from Lowe's, Ralph Lauren from Home Depot, Benjamin Moore from specialty paint retailers. I have found them all to be very good products.
Many painting contractors refuse to even try to apply this faux finish because they don't know the proper technique. The Do-It-Yourself-er has oftentimes been disappointed with their results for the same reason. The manufacturers training videos will often miss out on the practical applications required to apply this product to a real room. They tend to use sample boards that don't have the challenge of ceilings and adjoining walls. The purpose of this guide is to help you overcome those challenges. Whether you're a painting contractor or a DIYer, you will learn the proper techniques from start to finish.
The first issue when applying this paint finish is the texture of the wall. In order to get the best results, the texture needs to be an imperfect smooth texture. Below you will see an imperfect smooth texture to the left of an orange peel texture.
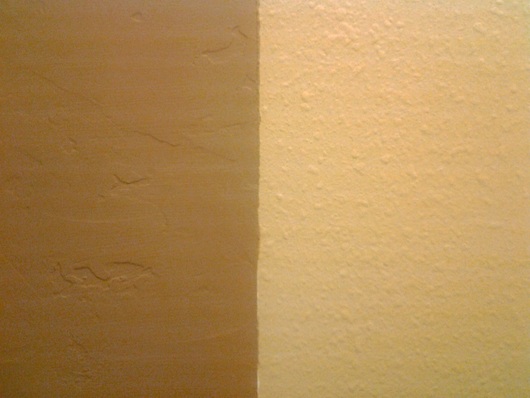
Imperfect Smooth Texture vs Orange Peel Texture. Source: Corbin Henry
If you're planning to paint a faux finish, many require an imperfect smooth textured surface.
This tutorial shows how to change an orange peel texture to imperfect smooth. Read more here...
This tutorial shows how to change an orange peel texture to imperfect smooth. Read more here...
Materials For A Brushed Suede Paint Project
The quantity of paint is dependant on the square footage of the area being painted. The manufacturer recommends 300-400 square feet per gallon, however, I like to always have more than enough in case of touch up work required at a later date. Therefore, I estimate it expecting it to cover 300 square feet.
OTHER RECOMMENDED TOOLS: A bucket hook for hanging the paint bucket on the ladder when brushing high on the wall. A 5-in-1 tool for opening paint cans and scraping off texture imperfections on the wall.
- Brushed suede paint. This project used Ralph Lauren brand paint from Home Depot.
- One QUALITY 3" or 4" NYLON/POLY TRIM BRUSH.
- One RALPH LAUREN SPECIALTY FINISH 9" ROLLER COVER.
- One RALPH LAUREN SPECIALTY FINISH 4.5" TRIM ROLLER
- One roller tray. (I like using tray sleeves, but you can clean the tray and reuse with different paints).
- Cloth drops to cover the floor around the walls in the room.
- Plastic sheeting to cover furniture.
- Polished cotton rags.
- A folding ladder tall enough to reach the ceiling, for painting cut-ins that may be out of reach.
- Plastic trash bags. Depending on the size of the area you may need several.
OTHER RECOMMENDED TOOLS: A bucket hook for hanging the paint bucket on the ladder when brushing high on the wall. A 5-in-1 tool for opening paint cans and scraping off texture imperfections on the wall.
The Preparation
Prepare the area to be painted by taping areas you do not wish to paint. Use drop cloths on the floor below the areas being painted.
Here are the general steps for this technique:
1. Cut in the borders with the paint brush.
2.Roll on the Brushed Suede paint. This is your base coat. The next step is the top coat.
3. You should cut in the 2nd top coat as you go. Then paint the X pattern over it. The top coat consists of a series of overlapping X's. Starting with 1 foot X's, the randomly applying 4-6 inch X's. You can use the flat edge and the narrow edges of the brush in random strokes. However, I find it takes less time and has a more uniform finish by using the flat edges only. You will start in the upper left corner and continue to the bottom right corner.
The Technique
This finish requires two coats. The 1st coat is called the base coat. The 2nd coat is called the top coat.
Basic Base Coat Technique: Like any regular painting technique. You cut in the entire wall, meaning that you brush paint the borders first. Then you will roll a W in about a 3' section, then fill in the rest of that area. Quickly move to the area next to it, and continue until the entire wall is painted. Then do another coat rolling the entire wall from top to bottom to reduce lap marks.
Basic Top Coat Technique: You will be painting a series of X's from the top left corner to the bottom right corner. You will work your way up and down the wall painting a wet line* as you go.
*A line is the area where the fresh paint meets the the dry paint. You will start by creating a diagonal line from the top of the wall to the left wall. As you cover more area the line will stretch from the top of the wall to the bottom of the wall.
Here are the detailed specific steps for this technique:
Using the brush, start in the upper left corner of the wall. Cut in 2-3 foot section of the border and then paint an X shape at the top left corner over the cut in. Then starting at the top right of the wet X, paint another X slightly overlapping the 1st X. The 3rd X will be below and to the left of the 2nd, and slightly overlap the 2nd. The 2nd and 3rd X's will cover the corner and create a diagonal line from the top of the wall to the left wall. This is your line. Continue following the line painting X's up and then down the line.
When you fill an area that has not been cut in, go ahead and paint a cut in about 1-2 feet long. Then start painting X's over it and work your way along your line to the next area requiring a cut in. You will repeat this process until you have covered the entire wall. You will finish in the bottom right corner of the wall.
TIPS: Commit to painting the entire wall in one session so that you don't have dried borders on the wall. They tend to stand out and have the look of an amateur.
Watch for drips on the wall as you paint and wipe them up quickly with a damp cloth or they will show through the top coat.
When you paint the X's, it's ok to paint large and small sizes in the same area.
It's important to note that you typically cannot fix an area by painting it after it has dried. If there is an imperfection, you must paint the entire area all over again in order to get a uniform finish.
Not intended for high-traffic areas.
Congratulations! You have taken on the challenge of a high-end faux finish, and now can enjoy the excitement and contentment of accomplishing this yourself!
