How to Apply Venetian Plaster to Orange Peel Textured Walls
Venetian Plaster On Orange Peel Textured Walls
Venetian plaster creates a luxurious polished marble-like finish over interior walls and ceilings. The manufacturer's instructions only apply to smooth surfaces. This article tells you how to apply it on an orange peel textured wall.
1. Lay down tarps in front of wall being worked on. Tape the baseboards. If the wall connects to another wall or ceiling that is not being plastered tape the adjoining surface. Make sure you press the tape edge firmly to prevent bleed-through.
2. Make sure the surface is clean and dry. Wet a clean rag and keep it near your work area to wipe up any drips. Pour Venetian Plaster into Mud pan/tray. Use about one third of a gallon at a time so that it doesn't dry before being applied.
3. I like the Plastic Spatula instead of a steel spatula because it causes less damage, applies more material faster, and is easier to control. Begin by loading the Plastic Spatula with Venetian plaster. Start in the upper corner of the project area, apply generous dabs of Venetian Plaster to the surface while holding the Plastic Spatula at a 15-30 degree angle. Use the small blades in your Venetian Plaster Steel Spatula set to apply material in narrow spaces like between door jams and corners.
4. Using the Plastic Spatula with light pressure, thinly spread the Venetian Plaster over the surface using long and short strokes in random directions. The high spots of the orange peel texture will show through, and that's okay because the purpose of the first three coats is to create a flat surface. Of course these underlying coats will also add beautiful dimensions to your final finish. You must wait 4 hours between coats.
5. After your final 4th coat wait 4 hours minimum and then sand the surface. The manufacturer recommends using 400-600 grit sand paper, but I have found that a simple Sponge Sanding Block works quite well and is much easier and less expensive. The surface will not be completely flat. It will have slight hills and valleys that will add to the depth of the finish.
6. With several clean wet rags, wash the dust off the entire surface and let it dry. Turn the rag frequently while wiping.
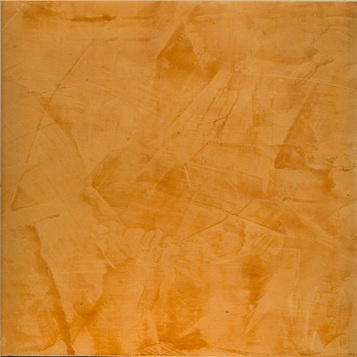
7. Use the Texturing & Polishing Trowel to burnish the surface. Burnishing will bring out the contrasting colors and make it shine to a satin finish.
8. The Venetian Plaster Steel Spatulas will give the finish a higher gloss than the burnishing tool, especially when they are brand new.
9. The final step to remove the tape. I recommend using a razor blade and cutting along the tapes edge before removing tape.
Tips: 1. You may want to practice on a sample board of some sort, either drywall or foam boards are available and inexpensive. You will find small drywall boards at home improvement stores and foam boards at many craft stores. 2. Wash tools with soap and water.
1. Lay down tarps in front of wall being worked on. Tape the baseboards. If the wall connects to another wall or ceiling that is not being plastered tape the adjoining surface. Make sure you press the tape edge firmly to prevent bleed-through.
2. Make sure the surface is clean and dry. Wet a clean rag and keep it near your work area to wipe up any drips. Pour Venetian Plaster into Mud pan/tray. Use about one third of a gallon at a time so that it doesn't dry before being applied.
3. I like the Plastic Spatula instead of a steel spatula because it causes less damage, applies more material faster, and is easier to control. Begin by loading the Plastic Spatula with Venetian plaster. Start in the upper corner of the project area, apply generous dabs of Venetian Plaster to the surface while holding the Plastic Spatula at a 15-30 degree angle. Use the small blades in your Venetian Plaster Steel Spatula set to apply material in narrow spaces like between door jams and corners.
4. Using the Plastic Spatula with light pressure, thinly spread the Venetian Plaster over the surface using long and short strokes in random directions. The high spots of the orange peel texture will show through, and that's okay because the purpose of the first three coats is to create a flat surface. Of course these underlying coats will also add beautiful dimensions to your final finish. You must wait 4 hours between coats.
5. After your final 4th coat wait 4 hours minimum and then sand the surface. The manufacturer recommends using 400-600 grit sand paper, but I have found that a simple Sponge Sanding Block works quite well and is much easier and less expensive. The surface will not be completely flat. It will have slight hills and valleys that will add to the depth of the finish.
6. With several clean wet rags, wash the dust off the entire surface and let it dry. Turn the rag frequently while wiping.
7. Use the Texturing & Polishing Trowel to burnish the surface. Burnishing will bring out the contrasting colors and make it shine to a satin finish.
8. The Venetian Plaster Steel Spatulas will give the finish a higher gloss than the burnishing tool, especially when they are brand new.
9. The final step to remove the tape. I recommend using a razor blade and cutting along the tapes edge before removing tape.
Tips: 1. You may want to practice on a sample board of some sort, either drywall or foam boards are available and inexpensive. You will find small drywall boards at home improvement stores and foam boards at many craft stores. 2. Wash tools with soap and water.
