How to Create an Imperfect Smooth Texture and Prepare Your Orange-Peel Textured Walls for a Faux Finish.
summary: If you're planning to paint a faux finish, many require an imperfect smooth textured surface. This tutorial show how to change an orange peel texture to imperfect smooth.
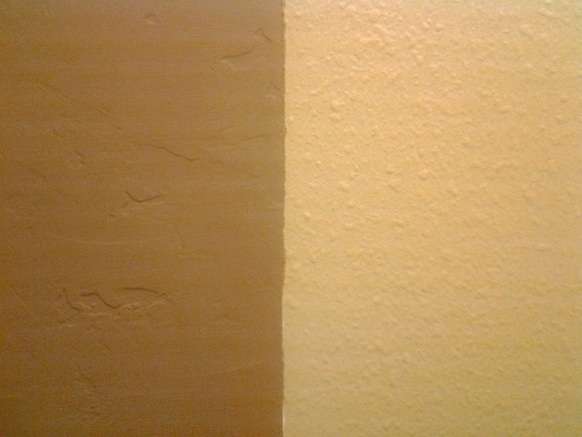
Sample Of Imperfect Smooth vs Orange Peel Textures. Source: Corbin Henry
Imperfect Smooth vs Orange Peel Texture
In the photo above you can see the two textures side by side. The imperfect smooth is on the left, and the orange peel is on the right.
The Project
Recently, I was asked to paint a Copper Metallic faux finish over an orange peel textured ceiling in a dining room. I had previously painted a copper metallic on orange peel texture and it looked muddy and bland, so I knew I had to do something different. After some research I discovered that in order for it to work I needed to make the texture an Imperfect Smooth finish. As it turns out, this texture is required for many different faux finishes. You can see a picture of the finished ceiling below.
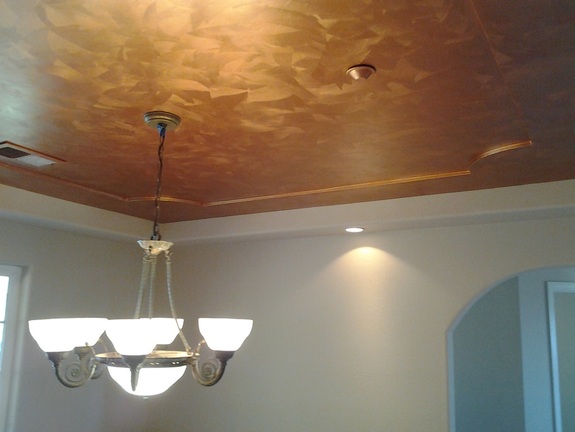
Copper Metallic Ceiling. Source: Corbin Henry
Close Up View Of Copper Metallic Faux Finish
In the image below you can see a close-up of how the copper metallic paint works on the imperfect smooth texture. This brush technique really makes the paint pop and adds warmth and color to the room. I find the copper metallic works really well in rooms with beige, brown, and soft yellow colors.
I expect other colors would also work well with this copper metallic, too. Maybe blues and reds. Keep in mind there are different colors and types of copper metallic paints. This is a copper metallic latex paint made by Behr which I found at Home Depot, not a copper metallic glaze which you may find made by Benjamin Moore. The results with a glaze are different.
I expect other colors would also work well with this copper metallic, too. Maybe blues and reds. Keep in mind there are different colors and types of copper metallic paints. This is a copper metallic latex paint made by Behr which I found at Home Depot, not a copper metallic glaze which you may find made by Benjamin Moore. The results with a glaze are different.
Close Up View Of Copper Metallic Faux Finish
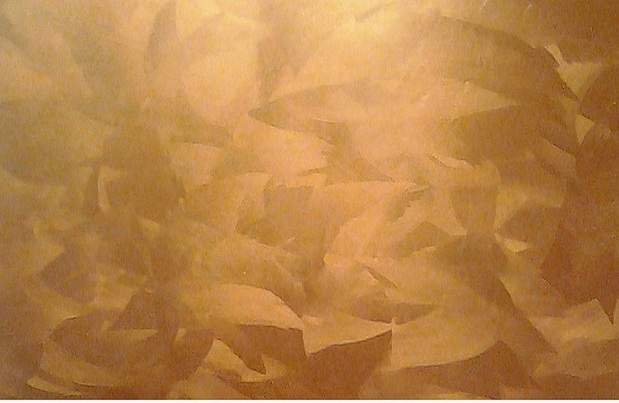
Close-up of Copper Metallic Paint. Source: Corbin Henry
Recommended Tools
Tools Recommended: A pool trowel. I use the Marshalltown 14 in. x 4 in. Pool Trowel from Home Depot. I use a plastic 5-way tool for the corners, and various small plastic taping knives to get into tight areas around door frames. A Venetian Plaster Steel Spatula Kit is perfect for really small areas.
- Two 5 gallon buckets; one for water to clean your tools, one for the plaster.
- Use a 12 in. Drywall Mud Tray with Metal Edge for holding the mud you're applying. Use a 5-way tool to load the mud onto the pool trowel and apply the mud to the wall with the pool trowel.
- Pre-Mixed Joint Compound . I like Westpac from Home Depot, but joint compounds will work, too.
- Use a 4-7/8 in. x 2-7/8 in. Fine/Medium Drywall Sanding Sponge for smoothing rough dried areas.
- A bag of painter's rags. I prefer the cotton t-shirt material. Shop towels leave a rough texture when cleaning up the wall, so avoid using them. Use a wet rag to keep your trowel clean while working, and to wipe up any rough spots on the wall.
The Process
The Imperfect Smooth texture is being used in many new homes and has been for the past several years. Orange peel textured walls were predominant before then. Many people are updating their orange peel textured walls to Imperfect Smooth now. Sometimes creating a feature wall like the wall around the fireplace. Other times it's done on a ceiling. The Imperfect Smooth texture is necessary for many faux finishes often seen on feature walls. So if you're up to it, here's how to do it.
In the photo above you can see an orange peel texture to the right of an imperfect smooth texture. There are many different textures similar to orange peel that this technique will work on as well.
1. Tape off wall and ceiling corners and also the baseboards.
2. Use drops to protect the floor. The drops are also used for staging your work area.
3. Prime wall and let dry. Some people have recommended sanding the wall, but that's not necessary. All you need is for the surface to have tooth for the mud to stick to it.
4. Start in the upper left corner and work your way to the bottom right corner. This will create a diagonal line of wet mud where the mud is being applied. You will want to work fast enough to work that diagonal line while it's still wet. If the mud starts drying it will become unworkable. In that case let it dry completely before continuing, or use a water spray-bottle to keep it wet. Fill the tray about half full. Apply in the corners with the 5-way tool. Once you're out of the corner use the pool trowel. Apply the mud to the pool trowel with a 4 inch plastic trowel then use the pool trowel to apply the mud to the wall. Hold the trowel at a shallow angle to create more texture and at a steep angle to create less texture. Spread it on thick like peanut butter then lightly scrape it off. Use this same technique for the second coat. Cover using an X shaped stroke to spread it on and an arcing stroke to smooth it. Lightly scrape off areas that are too thick. You want the surface to mostly be smooth, with shallow valleys randomly located across the surface. Once it's dried, prime and paint the wall.
5. You will do two coats for most surfaces, sometimes 3 or 4 coats depending on the depth of the texture. The first coat will fill in the valleys of the orange peel and be a thin coat lightly covering the top of the orange peel texture. The second coat will create valleys and add texture. The beauty of the Imperfect smooth finish is that once it's dry, you can lightly sand any rough dried areas easily. So it is easy to fix minor errors.
Once it's dry you can prime and paint your new faux finish as planned. Congratulations on preparing your new feature wall! I hope it serves you well! If you would like to know how to paint a Copper Metallic finish on your new imperfect smooth wall take a look at my article How to How To Paint A Brushed Copper Metallic Faux Finish. I have several other articles that may be helpful to you as well.
